Articles by "ANDROID"

Hello guys, today we are going to learn how to transfer data between computer and mobile phone without using USB cable. Let say you want to send your photos, music, and other files between your computer and your mobile phone (from your computer to your phone or from your phone to your computer) without using USB cable
There are several ways but in this tutorial we will discus two ways and these are


1.BY USING SHARE IT APPLICATION
REQUIREMENTS
. SHAREit for computer (PC)
. SHAREit for mobile phone
. Computer or laptop


STEPS
. Download SHAREit for pc from the link below the post and install it in your computer. How to install? It’s very simple just click on the file after it’s finished to be downloaded and then follow the installation instruction
. Download SHAREit for mobile phone from the link below the post and install it in your device .It is available for both android and Iphone(IOS). But the link below is only for android phone, you can download SHAREit for iphone from itune store or from other sites. How to install? Very simple just click on the file after it has finished to download and then follow the simple installation instruction make sure you enabled “Unknown Source” in your android phone, to do that just go to Setting>Security>Unknown Source.
.Open SHAREit in your computer and then setup your profile for the older version of SHAREit, if you have the latest version of shareit then the profile will be set automatically and the profile name will be the same as the computer name. Once you open SHAREit it will start to search for available network.

Captureh


. Open shareit in your phone and then choose the option that you want either “Send or Receive” . I recommend to choose Receive and then click on “Connect to PC” if you want to connect to your computer or “Connect to IOS/WP” if you want to connect on Mac. And then the app will start to search for available network and the the profile name of your SHAREit of your computer.

. Click on the profile name of your computer that will display on your phone. It will prompt you to inter the password of the profile of your computer, the default password is “32894352” or if does not work then click on  “Is your device you are searching for not found?” that located at the bottom of the SHAREit then click on show character and then you will be able to see the password and inter it to your phone. You will be prompted to accept on your computer just accept it. And we completely connected our computer and phone without using USB cable

 Capture1

 . To start transfer the data just look the following steps
.If you want to transfer files from your computer to your phone then just drag the files to the SHAREit and it will start to transfer automatically
. If you want send the files from your phone to your computer just navigate to the file that you want and the select it and then click “Next” and the file(s) will be sent to your computer.

DOWNLOAD SHAREit FOR PC 

DOWNLOAD SHAREit for ANDROID PHONE


.OTHER FEATURES OF SHARE IT
Even though we connected our mobile phone to computer and we have transferred the data between them but still there are another features of shareit we have to look how they work

 *Play To. This feature enable you to view your photos to your computer without send them to your computer
How to do?
It’s very simple just click on “Play To” on your phone and the app will navigate to your photos automatically
Now select the photo that you want to display to your computer. Once you have selected it will be displayed to your computer.

*Remote View. This features enable you to access the folders and files of your computer
How to do?
It’s very simple Click on “Remote View” and the you will be prompted to your computer to accept just accept it and you will be able to browse all the files and folders on your computer using your phone

*Backup Photos. This features enable you to backup all the camera photos to your computer
How to do?
Click on “Backup Phot…” on your phone and the backup process will begin

2016_08_28_18.05.18


METHOD TWO IS BY USING BLUESTARCKS APPLICATION

        This method involve the installation of suitable virtual android system in your computer. There are several applications that you can use to install and run virtual android system and applications
These applications include
.Bluestarck
.Andy android emulator
.Virtual box
.Geny motion
Among those application Andy android emulator is a powerful one but it requires good performance computer to run.
But in this tutorial I'll use Bluestarck to show you how transfer the data between computer and mobile phone with out usb cable. So just follow the steps below.

    This section involve the following
.Downloading bluestarck
.Installing and run bluestarck
.Installing android app on bluestarck
.Connecting your phone to your computer using share applications
So let get started
1. Download bluestarck from the link below or browse it from Google

2. After the download is finished run the program by double write click the program and then follow the simple installation instructions wait until the process is complete

3. Download android app apk from Internet that enabled you to transfer data between computer and mobile phone by means of wireless.  There are several apps like"Xender, Shareit, ShareApp" and so on.
To download apk application for android just got to Google ad search the app that you want and then followed by the word "apk"  and then you'll navigate to the site for download the application or if you have the apk file then copy it to the computer and then install it.

4. Now to install the Android application on bluestarck just double click on the apk file and the installation process will begin. In some cases some apk files does not set to open default with bluestarck thus it'll be difficult to install such apk to your bluestarck

To install such apk just right click on it and the click on properties. In the next window click change and it'll show the list of programs that can open it in default
If bluestarck appeared then choose it and click ok if it does not appeared then click browse and navigate to the program fole that you installed bluestarck and choose "bluestarck apk handler" and click ok.

Now the apk will be installed in your bluestarck by double click on it
.Connecting your phone to your computer using share application

Jus run bluestarck and then open share application in your bluestarck like xender or share it or any other share application

Now in your android phone open share application and search for available network you'll found the network the applications in your bluestarck and just use it to connect your Android device with your computer with out usb cabl and start to transfer the data.


img-filewin-BlueStacks


 COMPARISON BETWEEN THESE TWO METHOD
.The first method is very simple and it will take small time to download and installing the software because they have small size compared to the second method
.The second method give you an option to choose your favorite application for transfer data because you can install any android application in bluestarck

 DOWNLOAD BLUESTARCKS
Hello guys today i'm going to tell you how to flash samsung galaxy s2 but before that let me introduce some issue about samsung galaxy s2.
In fact samsug mobile phone are not likely to corrupt as compared to other mobile phone like tecno phone or huawei mobile phone, but it's not 100% that your samsung mobile phone may not corrupt that's why i wrote this article and you looking for it.

Why flashing your samsung mobile phone?
Here are the main reasons for flashing your samsung phone.
1. Your phone does not start up when you power it on.
2. When you power on your phone only samsung logo appear on the screen and nothing else.
3. When you tried to hard reset your phone by using recovery mode nothing has changed (still the problem is not solved).
If you experienced problem like this with your samsung android phone then you should flash your phone to solve this problems. So join me in this tutorial step by step.

What you need to do before flashing your phone?
You need to backup the data of your phone if it's important because flashing your phone will wipe your data and can not be recovered so if you have an important data so make sure to backup it.

HOW TO FLASH YOUR SAMSUNG GALAXY S2
Now follow the following procedures for safe flashing tour phone.

1. Download samsung USB drivers from here and install it in your computer, you can choose any language during installation or you can leave it as default.

2. Download samsung galaxy s2 flash file here and extract it to your desktop or any where in your computer.

3. Download odin 3 v3.07 from here  and extract it to your desktop or click here to download all version of odin3

4. Now open Odin307 folder and run odin3 by double click on Odin3 v3.07.

5. Press the volume down button, home button and power on button at the same time(home + volume down + power on). Your phone will boot in to download mode then release the buttons and then press volume up button to switch your phone in download mode.

6. Connect your phone using USB cable. If you have followed the above steps then odin will detect your phone and showing the "COM POT" of your phone. If your phone is not detected by odin3 then you didn't followed step wise the above procedures.

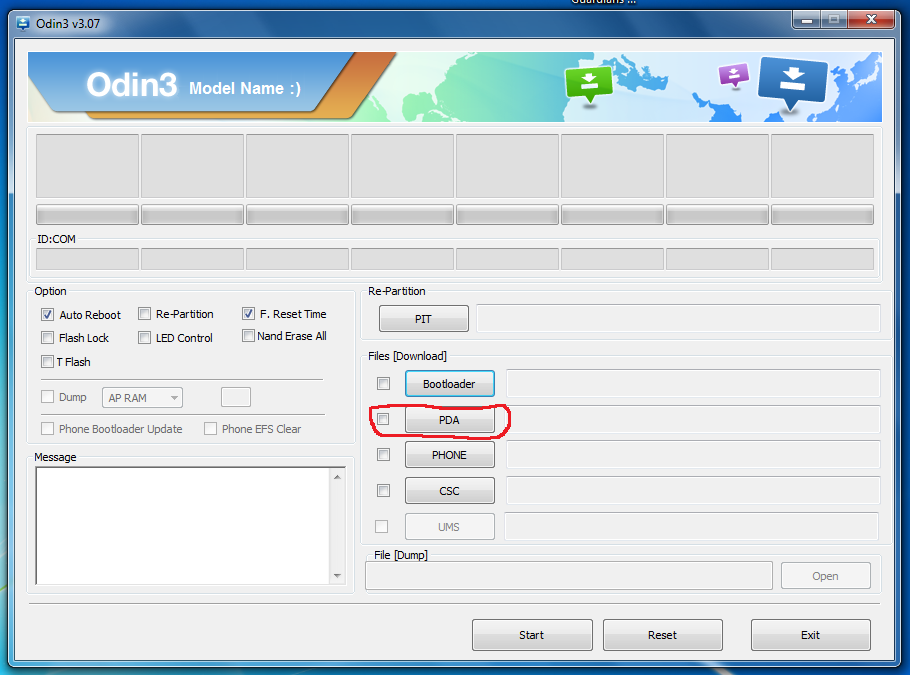
7. Once odin3 detected your phone click "PDA or PA" and then navigate to where you extracted your Galaxy s2 flash file and you will see the name of the file with ".md5.tar or .tar" extension. just select the file and wait for odin3 to check the files if it is correct or not.
Note if you don't know what you are doing then does not change any thing in odin3 because this may cause a serious problems with your phone.

8. Click "Start" and the flashing process will begin so wait until the flashing process is terminated. Note Your phone will will restart during flashing.
You are all done see the image below.


NOTE:
Do not touch your phone or USB cable while flashing process begin.
If you flashed your samsung galaxy s2 and when you power on it display only the samsung logo or restart itself then do the following simple procedures.
1. switch your phone in to recovery mode. To do this press volume up button, home button and volume up button at the same time.

2. Release the button once it is in recovery mode, and then choose wipe cache and then wipe data.

3. Choose reboot system and your problem is solved.

If your problem is not solved then you downloaded the wrong flash file then you have to download another version of odin3 or another file and and repeat the above procedures.

Hope this tutorial helped you.

Android is an open source mobile operating system provided by google.
In some case you installed an app in your android phone and when you run it say no root permission
or let say you want to change the imei number of your phone than you must root your phone

ADVANTAGES OF ROOTING YOUR ANDROID PHONE
1.It enable to run the apps that wont run with out root permission in your android
2.It help to customize your phone i.e to install the costumer rom
3.It help to upgrade your android version by installing a customer rom like lollipop rom.
4.It enable to change an imei number of your android phone.
This is great advantages because some android phone has a limited to use a mobile network in certain
area, when you switch on your phone it say "Emergency call only" or "No network Operator"
So in order to overcome this problem you must change the imei number of your phone

HOW TO ROOT YOUR ANDROID PHONE
There are several ways to root your android phone but there are two main ways,These are:
.Rooting your android by using Computer(PC)
.Rooting your android by using android phone

  1.HOW TO ROOT YOUR ANDROID BY USING COMPUTER
Here we can learn how to root android using a computer by following the steps below. This method take more time but it has greater probability of success

1.Download kingoroot from the link below this method and install it. Kingoroot is a software that we will use to root our android

2.Download Pda.net from the link below this post and install it by following installation instruction.
During this installation,make sure to select "other(or if you are not sure)"

3.In your mobile phone go to "Setting>Developer option>Enable USB debug" make sure you select enable USB debug.
or if you did not see the "developer option" then go to Setting>About>Build number" Then hit on build number three times or more, then go back to setting ,now you will be able to see the "Developer option”

4.Now connect your phone to computer using USB cable,The Pdanet will detect your phone,or if not try  to connect with different USB cable or re-install PDAnet.

5.Run kingoroot in your computer and wait to detect your phone.After your phone is detected kingoroot will tell you either your phone is already rooted or not,if not then click on "Root" Kingo root may ask you to accept the request to your phone ,just accept it and  the process will begin
Wait until the process is finished.it take take a while to complete so please be patient

7.After the process is finished the success message will appear,Now you have completely rooted your phone.
To check if you have rooted properly just go to home screen in your phone then check "Super User" if installed.


2.HOW TO ROOT AN ANDROID PHONE WITHOUT COMPUTER (PC) 
   BY USING KINGOROOT APK 
This method is suitable for MTK android phone 
In this method we will learn how to root android phone by using mobile android phone by following the steps below
1.download kingoroot apk from the link below this method and install it in your android phone. 
To install it just run the file after it finished to download,make sure to enable"Unknown source" 
To enable unknown source just go to "Setting>Security>Unknown Source" and select enable unknown source


2.Run kingoroot in your android,it will tell you either your phone is already rooted or not if not click on"click to root" and the rooting process will start automatically

3.Wait until the root process is finished,Please be patient it take a little time to complete it is very faster compared with the rooting with computer

4.After the process is finished go back to your home screen and then find super user,If you found it then you have successfully rooted your android


  BY USING FRAMAROOT APK 
This method is not suitable for MTK android phone 

1.Download framaroot apk and install it in you android 

2 Run the framaroot in your android and select install super user an select the exploit in below list 
You will see the successful message if your phone is rooted if not try to use different exploit if not then use the methods above


CONCLUSION
Rooting an android phone using a computer it take more time then using android phone but it has great probability of success


Android has a different version and this version has a different flavor .But many people wonder how they can update their android device.
Don't worry since android is an open source mobile operating system then we can flash the custom rom in our android device and to have a different flavor.
In this tutorials I will tell you how to flash a custom rom on your android device step by step.
Also you can learn how to upgrade your android device to android 5 to higher version. So lets get started.

WHAT YOU NEED TO HAVE BEFORE FLASHING YOUR PHONE?
.Your android device(rooted) or read How to root any android device if your device is not rooted.
.Custom recovery: This will help us to install a custom rom.
.A computer or Laptop. this will help us to install a custom recovery in our android device.
.External SD-card.
.Mtk usb driver (for mediatek device).

STEPS DESCRIPTIONS
Step one: This Step involve downloading the correct required software and files, so if you have the correct software and files then you can skip this step

Step two: This step involve installing custom recovery in our android device, also if you have custom recovery installed in your device then you can skip this step.

Step three: It involve Flashing the custom rom using custom recovery. Now let discuss each step in detail, I assume that you have rooted your device if not then reed this article"How to root any android device".

FOR MEDIATEK DEVICE: It includes Tecno mobile phone,Sony Clone(XB-O) and other copy of Samsung mobile phone.

STEP ONE
If your device is a MEDIATEK(MTK) then download the following files.

Download CTRv2.2 and extract it to your desktop

Download Custom room for your device and save it to your external SD-Card. You can find it below or by searching it from google.

Download Mtk drivers and install it in your computer or click here to read full tutorials on how to install MTK Drivers

Download corresponding Gapps and save it to your external memory card

STEP TWO: Installing custom recovery
1.Open CTRv2.2 folder and then run CTRv2.2 by double click on it and then click yes to auto port.

2.Connect your android device and then click OK and the process will begin and wait until it is terminated.
NOTE: You may be asked to grant CTR by super user in your device so just grant it.

STEP THREE
THIS STEP IS FOR ALL MOBILE PHONE.
1. Switch your phone in to recovery mode. To do this just power off your phone, the press Home + Volume Up + Power on button at the same time OR press Volume down + Power on button Or Volume down + Volume Up + Power on button for about 5 seconds.

2. Now go ahead and click "install zip from sdcard" or "Install", and then you will be directed to your external sdcard.

3. In your external sdcard select the custom rom of your phone that you saved in it and the proceed to install it.
4. Again click install zip from sdcard or install and navigate to where you saved your GApps and then install it.

5. Now go back and select "wipe data/factory reset"

6. Select Wipe cache "partition"

7. Select "reboot system now"
And you are all done.


FOR SAMSUNG AND OTHER DEVICE.

Download Clockworkmod apk and instal it in your android device.

Download Custom rom for your device and save it to your external SD-card.

Download the corresponding Gapps and save it to uor external memory card
Now you have downloaded all the required files now lets go to step two

Run Rom menager and click install ClockworkMod Recovery and then follow the simple instructions.

NOTE:  Your device will reboot in order to install ClockWorkMod recovery.
Now we have done well step two so lets go to step three.

STEP THREE
THIS STEP IS FOR ALL MOBILE PHONE.
1. Switch your phone in to recovery mode. To do this just power off your phone, the press Home + Volume Up + Power on button at the same time OR press Volume down + Power on button Or Volume down + Volume Up + Power on button for about 5 seconds.

2. Now go ahead and click "install zip from sdcard" or "Install", and then you will be directed to your external sdcard.

3. In your external sdcard select the custom rom of your phone that you saved in it and the proceed to install it.

4. Again click install zip from sdcard or install and navigate to where you saved your GApps and then install it.

5. Now go back and select "wipe data/factory reset"

6. Select Wipe cache "partition"

7. Select "reboot system now"
And you are all done.


If you have any problem or question then drop the comment below

NOTE: This is just the general method so you are flashing the rom at your own risk i'm not responsible for any damage.

Below are some custom rom for some android device


The first thing to know is what is flashing an android device?
Flashing is the process of changing the rom of your Android device, this means that you change the whole system of your android evidence, so you have to be careful while flashing your Android device because some time you may damage your device
The second thing to know is why we flash our android devices?
We flash our android for the following reasons
.To unbreak our device. This means that if the device is damaged for example it's failed to Boot i.e when you switch on your phone doesn't show your home screen only it Show the logo of your phone like "Samsung" or "tecno"
.To upgrade the version of android system for example you want to upgrade from android 2.3.6 to 4.4.2 , 4.4.4, 5.1.or higher
.Sometimes if your phone doesn't not switch on at all you can fix it by flashing

HOW TO FLASH
There are several ways to flash your android device but here i will talk about two common ways and these are
.Flashing using the sp-flash tool, this method suitable for flashing MTK android phone, now a day the mtk phone are widely used. This includes the All sony clone (X-BO) for example xperia z3, v3+ and some other samsung copy like galaxy j1 and other

.Flashing using odin.This method is for Samsung only that's not an mtk phone
Before flashing you need to know the chip type of your phone either mtk or other

1.HOW TO FLASH ANDROID PHONE USING SP-FLASH TOOL
As I mentioned above that flashing android phone using sp-flash tool is suitable for MTK device only
To determine either your phone is mtk or not you can google it or you can download some suitable application from play store
Flashing android phone sometimes may in counter serious problem so please and please be careful while flashing your device just follow the steps below

  REQUIREMENTS
.USB-VCOM DRIVERS
.SP-Flash tool
.USB Cable
.Flash file for your device
.Computer (laptop or desktop)

  STEP ONE
.INSTALLATION OF USB-VCOM DRIVERS
Manual and automatic installation

1.MANUAL INSTALLATION
.Download USB VCOM DRIVERS from the link above and extract it to your computer
.Write click on Computer and then click manage and then click device manager. Here you will see the drivers that's installed in your computer
.Click on "other devices" and then click on "Action" and select "Add new hardware legacy" and then click Next
.Choose "Install the hardware that I manually select from a list(Advanced)" and then click Next and Next again
.In the next window click "Have Disk..." in the next pop up window click on "Browse" and then navigate to where you extracted the drivers and then select open "MT65xx" then choose the system type that you are using either "64Bit Or 32Bit" and then open usbvcom drivers and then follow the instructions to installation.

2. AUTOMATIC INSTALLATION
.Open the file that you extracted and then open Driver Auto installer and then run the installer
The drivers will be installed automatically

STEP TWO
DOWNLOADING THE FLASH FILE FOR YOUR DEVICE
Flash file is the file that contain all the system and the application that we want to flash our device
You can download it by searching it on Google. Just go to Google and then search for the flash file by typing the name, model and then followed by the word flash file and then you can navigate to the site for example "Sony xperia v3+ flash file free download". Be careful while choosing the file and download it from trusted websites because some other upload the different file.
I advise to read the post and comments before to download

STEP THREE
FLASHING YOUR DEVICE
1. Download Spflash tool from the link below and extract it to your computer

2. Download flash file for your device and extract it to your computer.

3. Open the Spflash tool file and then run "flash_tool" I recommend to run as administrator
In the Spflash tool click "Scatter-Loading" to add the scatter file and then navigate to where you extracted the flash file and then open it and it looks like "MT65xx Android Scatter". The Spflash tool will load the files .
Do not  select the pre loader if you don't know what you are doing because this can break the phone and cannot be flashed again so make sure to not select it and then click download

4. Remove the battery of your phone and then connect to the computer using usb cable. The red bar will appear at the bottom of the Spflash tool to indicate that the phone is connected and the drivers is working properly
If your phone does not detected don't panic try to use different USB Cable or reinstall the drivers.

5. Immediately inset the battery and then the yellow bar will start to proceed. This indicates that the flash file is compatible with your device
The flashing process will start automatically so relax and wait until the flashing process is terminated.

  The green cycle with tick will appear the flashing process is terminated
If the flashing process doesn't started then try to download another flash file because the file may be does not match your device or it contain some errors
Now power on your device and then setup your device for first uses. It will take time to start up so please wait.


NOTE: Don’t disconnect the device or even don’t touch the phone, usb cable or even the phone while the flashing process is started until it’s finished
I'm not responsible for any risk.

HOW TO FLASH SAMSUNG ANDROID PHONE
This method cannot be applied to MTK phone this is used for Samsung only

REQUIREMENTS
.Samsung USB mobile drivers
.USB Cable
.Computer (Laptop or desktop)
.Flash file for your Samsung phone
.Odin

STEPS
1. Download Samsung USB mobile drivers and install it.

2. Download Odin file and extract it to your computer. This file contain two folders odin multi downloader and cooper_v1.0.ops or you can download other version of odin three by browsing it from google. Odin is a tools that we use to flash samsung phone

3. Power off your device and then hold volume down and press power button or hold volume key down and home button and then press the power button to switch the phone in to download mode.

4. Open odin multi downloader and then click on"OPS" and then navigate to where you extracted the cooper_v1.0.ops and open it

5. Select on One Package if your flash file is in one package or do not select It if you don't have a one package file.
If it's one package then click on one package at the bottom of the odin and then navigate to where you extracted the flash file and then open it

6. Connect your phone to your computer using usb cable and wait for the odin to detect the phone
If your phone does not detected then try to reinstall the drivers and then try to connect again.

7. Click Start and the flashing process will start automatically.Wait until the flashing process is finished.
.The phone will reboot automatically and it take a time than normal so please wait.


NOTE: Don’t touch your phone or usb cable while you flashing your device
You are doing at your own risk.

FILES YOU MAY DOWNLOAD


MT65xx Driver_Auto_Installer_v5.1453    DOWNLOAD

 MT65xx Driver_Auto_Installer_v5.1524 DOWNLOAD

SAMSUNG_USB_Driver_for_Mobile_Phones_v1_3_2300_0   DOWNLOAD

       FLASH TOOLS


SP_Flash_Tool_v5.1636  DOWNLOAD

Odin_3  DOWNLOAD

IMEI stand for International Mobile Equipment Identity.Is a number, usually unique used  to identify 3GPP(3rd Generation Partnership Project) such as GSM, UMTS and LTE.
It is usually found printed inside the battery compartment of the phone, or you can see it in your phone's scree by typing *#06# on a deal pad.
The IMEI number is used  to identify valid devices, thus we can say that IMEI is the mobile phone identity.
Thus as people can forge their identity also we can forge the phone identity by changing the imei number.Changing imei number is illegal in some countries but it has some advantages and also it has disadvantages.
IMEI is used to trace the location of a device or find the stolen device so we can make a device untraceable by changing its IMEI number, serial number and device id.

There are so many ways of changing IMEI number of an android device. Even on internet there are so many ways but and you can follow step by step but most of them come with negative result.
So today i come up with three methods that has greater probability of success.Depending on the hardware type of your phone changing imei is quiet different some hardware is easy and some of them are very hard and have less probability of success.

REASONS TO CHANGE IMEI NUMBER
Make you device untraceable and unreachable,
Fix invalid IMEI  number problem on any android devices
Reset/Update/Repair your Device,
Getting an Unique device ID.

How to know the imei number of your device? it is  very simple, in a dial pad just inter *#06# and your imei number will be displayed.

IN THIS TUTORIAL I CAN TELL YOU HOW TO CHANGE AN IMEI NUMBER ON ANY ANDROID (MTK) DEVICE.
This method require you to have a rooted android device. If you don't know how to root then read this article:  HOW TO ROOT ANY ANDROID PHONE

BY REPLACING IMEI NUMBER USING MTK-DROID TOOL.
In this method we will change the imei number for a rooted device, this method will not work for un rooted device.
REQUIREMENTS:
Mtk-Droid tool: This is a software tool used to replace the imei number of your device.
PDAnet: This is a software that will install driver in your computer, this drivers enable the Mtk-Droid tool with your phone and make the changes to your phone that you can apply through the Mtk-droid tool.
Computer and Android device(phone or tablet) that you want to change the IMEI number.

PROCEDURES
1. Download Mtk-Droid tool and extract it to your desktop Or any where in your computer. The rar password is androidmtk.com

2. Download PDAnet drivers and install it in your computer. How to install PDAnet? It is very simple just double click the downloaded file and follow the installation instructions.
NOTE: During Installation remember to choose "Other device". Because this will install driver that support all android device.

3. Open MTk-droid tool extracted and scroll down until you see "MTK-droid tool.exe" right click on it and then click "Run as administrator".

4. Once it is opened connect your android device(phone or tablet) while USB debugging is enabled. if you don't know how to enable USB debugging then follow this steps.
In your android go to settings scroll down to navigate to the "Developer Option" then turn on the Developer option.Then check box the "USB debugging".

NOTE: In some case Developer option does not appear in settings so what you need to do is go to settings then navigate to "About device" click "Build number" more than four(4) times then developer option will appear in settings menu.
Also there is more important thing once you connected your device in debugging mode PDAnet will prompt you to your phone to accept just check the box and accept it.
If every thing goes right then MTK-droid tool will detect your phone and it will display the info of your phone.


5. Click "root" in MTK-droid tool and you will be prompted in your phone to grant, just grant it.

6. Click "IMEI/NVRAM" in the popup window inter the imei number that you want example "354123567856346" and then click replace. After that click "Reboot", your phone will reboot and you are all done.
Now to see your new imei number just enter *#06#. in a dial pad

RESTORE THE BACKUP OF "NVRAM" FILE USING MTK-DROID TOOL.

This method require a backup file of nvram, NVRAM is a file that contain all the information about IMEI,Bluetooth address, wifi address etc. Usually it is in tar format.

1. Proceed from step one(1) up to step five(5) as explained in method one above.

2. Click IMEI/NVRAM and then and check  the "/data/nvram (folder with files)" boxes navigate where you have saved NVRAM backup and select NVRAM backup file and then click Restore, you have to reboot your phone to apply the changes.

3. Click Reboot to apply the changes to your phone. And you are all done.
NOTE:You must have a backup of nvram file or download NVRAM here.

BY USING ROOT EXPLORER.
If you phone is already rooted then this method does may not require a computer or any drivers. Due to this reason this method is very simple and has a greater probability of success.

PROCEDURES
1. Download Root explorer apk and install it in your android phone.
To install it just run the file after it is finished to download, make sure "Unknown source" is enabled
To enable unknown source just go to "Setting>Security>Unknown Source" tick "enable unknown source".

2. Extract NVRAM file that you have backed up, you can extract it using root explorer or you can use Winrar in your computer. or download NVRAM here and extract it and copy the file to the phone  storage.


3. Open Root explorer in your phone navigate to phone storage and copy the NVRAM file.

4. In root tab navigate to or search "NVRAM" and replace it with the new NVRAM file that contain new IMEI number.

CONCLUSION:
Changing an imei number is illegal in some country this is just the procedures to follow. For that I'm not responsible for any illegal issue that may happen to you.If you have any problem about this procedures then feel free to tell me just leave a comment below.

If this article helped you then feel free to share.

Hello guys today  I'm coming with tecno H6 stockrom. Tecno Phones become popular in use and mostly in Africa it is because of it's simplicity and flexibility also it price is low.
But this phone may have some system problems that includes:
1. The application run automatically
2. When you are connected to the internet the phone download files automatically that are not your desire
3. Or it display message like "unfortunately system has stopped" or "unfortunately google play service has stopped".
4. When you power on your phone display only logo and nothing else is happen.
5. when powering on your phone only white screen appear and nothing else.
If you have a problem like this then you have to flash your phone in order to over come these problems so i'll give you the link for Tecno H6 flash file to flash your phone.
Of cause you have an ides of flashing that's why you are here on this post but i suggest you to read this full content that may help you to escape unexpected error during flashing your phone.
Also read a full TECNO H6 SPECS to compare with your phone. also this will prevent flashing the wrong rom.


NOTE: Flashing the wrong stockrom may cause a serious problems and some time may damage your phone and can't be flashed again.
As I said that you have an idea of flashing so you are flashing your rom on your own. I'm not responsible for any damage.

Short tutorial on how to flash your tecno H6, Please read this tutorials to prevent any error while flashing your phone.

1. Download MTK USB-VCOM driver and install it in your computer. If you don't know how to install this driver then read read full tutorial on how to install MTK USB-VCOM drivers.

2. Download SP-Flash tool and extract it to your computer.

3. Download TECNO H6 firmware/flashfile and extract it to your computer.

4. Open Sp flash tool folder that you extracted and run "flash_tool.exe" or "flash tool" .(Recommended to run it as administrator"Run as administrator").

5. Click choose "Scatter loading file" and navigate where you extracted your flash file and then select the scatter file usually it looks like "MT6572_Android_scatter".

6. In sp flash tool do not select preloader if you don't what you are doing and then click download.

7. Power off your phone and an then remove the battery.

8. Connect your phone to your computer using USB cable wit out battery.

9. Once your computer has detected your phone then immediately inset your battery. If your phone did't detected your phone then the driver is installed correctly or your USB cable does not work properly so try to fix these issues and try again.

10. Wait until the flashing process is done.

11. Disconnect your phone from computer and power it on.
You are all done.

NOTE:Once you power on your phone it will take long time at the first time then normal.
     
      TECNO H6 SPECS
         
             GENERAL
OS:        Android 4.4.2 KitKat
Processors: 1.3GHz quad-core Cortex-A7 CPU, MediaTek MT6582 chipset, Mali-400MP2 GPU
RAM:        1GB
Card slot: MicroSD, up to 32 GB
Storage: 8GB
Dimensions:     129.7 x 64.5 x 9.8 mm
Keyboard: Touchscreen
Colors:        White, Black, Silver
Cover:        Plastic
SIM        Dual mini SIM
           
              CAMERA
Primary:        8MP, up to 2448 x 3264-pixel pictures.
Secondary:      2MP, up to 1600 x 1200-pixel pictures
Video:          1080p

             DISPLAY
Type:        TFT capacitive touchscreen with 16,000,000 colors
Size:        720 x 1280 pixels, 5 inches, 293 pixels per inch (PPI)

             NETWORK
2G Network GSM 850 / 900 / 1800 / 1900
3G Network HSDPA 900 / 2100
4G Network No          
       
             CONNECTIVITY
2G:       GPRS – up to 85.6 kbps; EDGE – up to 236.8 kbps
3G:       Up to 21 mbs downlink; Up to 5.76 mbs uplink
4G:       No
WIFI:       Wi-Fi 802.11 b/g/n, WIFI hotspot, WIFI direct
Bluetooth:     Version 3.0
GPS:       A-GPS
USB:       MicroUSB v2.0

           BATTERY
Capacity:      2350mAh Li-Ion battery


Click the button below to download Tecno H6 Variant 1


Hello guys today tecno H5 stock rom is here. Tecno Phones become popular in use and mostly in Africa it is because of it's simplicity and flexibility also it price is low.


But this phone may have some system problems that includes:
1. The application run automatically
2. When you are connected to the internet the phone download files automatically that are not your desire
3. Or it display message like "unfortunately system has stopped" or "unfortunately google play service has stopped".
4. When you power on your phone display only logo and nothing else is happen.
5. when powering on your phone only white screen appear and nothing else.

If you have a problem like this then you have to flash your phone in order to over come these problems so i'll give you the link for Tecno H5 flash file to flash your phone.
Of cause you have an ides of flashing that's why you are here on this post but i suggest you to read this full content that may help you to escape unexpected error during flashing your phone.
Also read a full TECNO H5 SPECS to compare with your phone. also this will prevent flashing the wrong rom.


NOTE: Flashing the wrong stockrom may cause a serious problems and some time may damage your phone and can't be flashed again.
As I said that you have an idea of flashing so you are flashing your rom on your own. I'm not responsible for any damage.

Short tutorial on how to flash your tecno H5, Please read this tutorials to prevent any error while flashing your phone.

1. Download MTK USB-VCOM driver and install it in your computer. If you don't know how to install this driver then read read full tutorial on how to install MTK USB-VCOM drivers.

2. Download SP-Flash tool and extract it to your computer.

3. Download TECNO H5 firmware/flashfile and extract it to your computer.

4. Open Sp flash tool folder that you extracted and run "flash_tool.exe" or "flash tool" .(Recommended to run it as administrator"Run as administrator").

5. Click choose "Scatter loading file" and navigate where you extracted your flash file and then select the scatter file usually it looks like "MT6572_Android_scatter".

6. In sp flash tool do not select preloader if you don't what you are doing and then click download.

7. Power off your phone and an then remove the battery.

8. Connect your phone to your computer using USB cable wit out battery.

9. Once your computer has detected your phone then immediately inset your battery. If your phone did't detected your phone then the driver is installed correctly or your USB cable does not work properly so try to fix these issues and try again.

10. Wait until the flashing process is done.

11. Disconnect your phone from computer and power it on.
You are all done.

NOTE:Once you power on your phone it will take long time at the first time then normal.
     
      TECNO H5 SPECS
         
GENERAL
OS:        Android 4.2 Jelly Bean
Processors: 1.0GHz dual-core CPU, MediaTek MT6572 chipset
RAM:        512MB
Card slot: MicroSD, up to 32 GB
Storage: 4 GB
Dimensions:     124 x 65.8 x 11.65mm
Keyboard: Touchscreen
Colors:        White, Black
Cover:        Plastic
SIM        Dual mini SIM
           
              CAMERA
Primary:        5MP, up to 2592Ñ…1944-pixel pictures.
Secondary:      0.3MP, up to 640×480-pixel pictures
Video:          720p
             DISPLAY
Type:        TFT capacitive touchscreen with 16,000,000 colors
Size:        720 x 1280 pixels, 5 inches, 293 pixels per inch (PPI)

             NETWORK
2G Network GSM 900 / 1800
3G Network HSDPA 2100
4G Network No          
       
             CONNECTIVITY
2G:       GPRS – up to 85.6 kbps; EDGE – up to 236.8 kbps
3G:       Up to 22.2 mbps downlink; Up to 5.76 mbps uplink
4G:       No
WIFI:       Wi-Fi 802.11 b/g/n, WIFI hotspot, WIFI direct
Bluetooth:     Version 3.0
GPS:       A-GPS
USB:       MicroUSB v2.0

           BATTERY
Capacity:      1800mAh Li-Ion battery
Talktime :     Up to 5 hours 20 minutes
Standby Time:  Up to 180 hours

Click the button below to download Tecno H5 Old OS


Click the button below to download New OS variant 2 (Tecno H5-UP09-20140610-MP)


Click the button below to download Tecno H5 (MT6572_TECNO_H5__up09_tecno_h5__4.2.2__ALPS.JB3 )

Hello guys once again  I'm coming with tecno F8-FANTOM A2 stockrom. Tecno Phones become popular in use and mostly in Africa it is because of it's simplicity and flexibility also it price is low.

But this phone may have some system problems that includes:
1. The application run automatically
2. When you are connected to the internet the phone download files automatically that are not your desire
3. Or it display message like "unfortunately system has stopped" or "unfortunately google play service has stopped".
4. When you power on your phone display only logo and nothing else is happen.
5. when powering on your phone only white screen appear and nothing else.

If you have a problem like this then you have to flash your phone in order to over come these problems so i'll give you the link for Tecno F8 PHANTOM A2 flash file to flash your phone.
Of cause you have an ides of flashing that's why you are here on this post but i suggest you to read this full content that may help you to escape unexpected error during flashing your phone.
Also read a full F8 PHANTOM A2 SPECS to compare with your phone. Also this will prevent flashing the wrong rom.

NOTE: Flashing the wrong stockrom may cause a serious problems and some time may damage your phone and can't be flashed again.
As I said that you have an idea of flashing so you are flashing your rom on your own. I'm not responsible for any damage.

Short tutorial on how to flash your tecno F8 Phantom A2, Please read this tutorials to prevent any error while flashing your phone.

1. Download MTK USB-VCOM driver and install it in your computer. If you don't know how to install this driver then read read full tutorial on how to install MTK USB-VCOM drivers.

2. Download SP-Flash tool and extract it to your computer.

3. Download TECNO F8 Phantom A2 firmware/flashfile and extract it to your computer.

4. Open Sp flash tool folder that you extracted and run "flash_tool.exe" or "flash tool" .(Recommended to run it as administrator"Run as administrator").

5. Click choose "Scatter loading file" and navigate where you extracted your flash file and then select the scatter file usually it looks like "MT6572_Android_scatter".

6. In sp flash tool do not select preloader if you don't what you are doing and then click download.

7. Power off your phone and an then remove the battery.

8. Connect your phone to your computer using USB cable wit out battery.

9. Once your computer has detected your phone then immediately inset your battery. If your phone did't detected your phone then the driver is installed correctly or your USB cable does not work properly so try to fix these issues and try again.

10. Wait until the flashing process is done.

11. Disconnect your phone from computer and power it on.
You are all done.

NOTE:Once you power on your phone it will take long time at the first time then normal.
     
      TECNO F8 SPECS
         
GENERAL
OS:        Android 4.2 Jelly Bean
Processors: 1.2 GHz quad-core Mediatek MT6589 CPU
RAM:        1 GB
Card slot: MicroSD, up to 32 GB
Storage: 4 GB
Dimensions: 160 x 82 x 8.9mm
Keyboard: Touchscreen
Colors:        White, Black, Yellow
Cover:        Plastic
SIM        Dual mini SIM
           
              CAMERA
Primary:        13MP, up to 4128×3096-pixel pictures.
Secondary:      8MP up to 3264×2448 pixel pictures
Video:          1080p
             DISPLAY
Type:        TFT capacitive touchscreen with 16,000,000 colors
Size:        720 x 1280 pixels, 5 inches, 293 pixels per inch (PPI)

             NETWORK
2G Network GSM 900 / 1800
3G Network HSDPA 2100
4G Network No          
       
             CONNECTIVITY
2G:       GPRS – up to 85.6 kbps; EDGE – up to 236.8 kbps
3G:       Up to 7.2 mbps uplink; Up to 5.76 mbps downlink
4G:       No
WIFI:       Wi-Fi 802.11 b/g/n, WIFI hotspot, WIFI direct, dual-band
Bluetooth:     Version 3.0
GPS:       A-GPS
USB:       MicroUSB v2.0

           BATTERY
Capacity:      2630mAh Li-Ion battery
Talktime :     Up to 17 hour
Standby Time:  Up to 420 hours

Click the button below to download this rom


Hello guys today  I'm coming with tecno F7-FANTOM A1+ stockrom. Tecno Phones become popular in use and mostly in Africa it is because of it's simplicity and flexibility also it price is low.

But this phone may have some system problems that includes:
1. The application run automatically

2. When you are connected to the internet the phone download files automatically that are not your desire
3. Or it display message like "unfortunately system has stopped" or "unfortunately google play service has stopped".
4. When you power on your phone display only logo and nothing else is happen.
5. when powering on your phone only white screen appear and nothing else.
If you have a problem like this then you have to flash your phone in order to over come these problems so i'll give you the link for Tecno F7 Fantom A1+ flash file to flash your phone.
Of cause you have an ides of flashing that's why you are here on this post but i suggest you to read this full content that may help you to escape unexpected error during flashing your phone.
Also read a full TECNO F7 Fantom A1+SPECS to compare with your phone. also this will prevent flashing the wrong rom.


NOTE: Flashing the wrong stockrom may cause a serious problems and some time may damage your phone and can't be flashed again.
As I said that you have an idea of flashing so you are flashing your rom on your own. I'm not responsible for any damage.

Short tutorial on how to flash your tecno F7_A1+, Please read this tutorials to prevent any error while flashing your phone.

1. Download MTK USB-VCOM driver and install it in your computer. If you don't know how to install this driver then read read full tutorial on how to install MTK USB-VCOM drivers.

2. Download SP-Flash tool and extract it to your computer.

3. Download TECNO F7 A1+ firmware/flashfile and extract it to your computer.

4. Open Sp flash tool folder that you extracted and run "flash_tool.exe" or "flash tool" .(Recommended to run it as administrator"Run as administrator").

5. Click choose "Scatter loading file" and navigate where you extracted your flash file and then select the scatter file usually it looks like "MT6572_Android_scatter".

6. In sp flash tool do not select preloader if you don't what you are doing and then click download.

7. Power off your phone and an then remove the battery.

8. Connect your phone to your computer using USB cable wit out battery.

9. Once your computer has detected your phone then immediately inset your battery. If your phone did't detected your phone then the driver is installed correctly or your USB cable does not work properly so try to fix these issues and try again.

10. Wait until the flashing process is done.

11. Disconnect your phone from computer and power it on.
You are all done.

NOTE:Once you power on your phone it will take long time at the first time then normal.
     
      TECNO F7 SPECS
       
       GENERAL
OS:        Android 4.0 Ice Cream Sandwich
Processors: 1.2 GHz dual-core Mediatek MT6577H CPU
RAM:        1 GB
Card slot: MicroSD, up to 32 GB
Internal: 4 GB
Dimensions: 143.5×70.8×9.1mm
Keyboard: Touchscreen
Colors:        White, Black, Yellow
Cover:        Plastic
SIM        Dual mini SIM

             CAMERA
Primary:        8 MP, up to 3264×2448 pixel pictures.
Secondary:      1.3MP

             DISPLAY
Type:        TFT capacitive touchscreen with 16,000,000 colors
Size:        720 x 1280 pixels, 5 inches, 293 pixels per inch (PPI)
           
              NETWORK
2G Network GSM 850 / 900 / 1800 / 1900
3G Network HSDPA 2100
4G Network No          

             CONNECTIVITY
2G:       GPRS – up to 85.6 kbps; EDGE – up to 236.8 kbps
3G:       Up to 7.2 mbps uplink; Up to 5.76 mbps downlink
4G:       No
WIFI:       Wi-Fi 802.11 b/g/n, WIFI hotspot, WIFI direct, dual-band
Bluetooth:     Version 3.0
GPS:       A-GPS
USB:       MicroUSB v2.0

BATTERY
Capacity:      2100mAH Battery
Talktime (3G): Up to 12 Hours
Standby Time:  Up to 400 Hours

Click the button below to download Tecno F7 Phantom A+ 4.2 MT6589 (MTK Backup)


Hello guys today  I'm coming with tecno P5 stockrom. Tecno P5 became popular and mostly in Africa it is because of it's simplicity and flexibility also it price is low.

But this phone has got some system problems that includes:
1. The application run automatically
2. When you are connected to the internet the phone download files automatically that are not your desire
3. Or it display message like "unfortunately system has stopped" or "unfortunately google play service has stopped".
4. When you power on your phone display only logo and nothing else is happen.
5. when powering on your phone only white screen appear and nothing else.

Then you have to flash your phone in order to over come these problems so i'll give you the link for Tecno P5 flash file to flash your phone.

Of cause you have an ides of flashing that's why you are here on this post but i suggest you to read this full content that may help you to escape unexpected error during flashing your phone.
Also read a full TECNO P5 SPECS to compare with your phone. also this will prevent flashing the wrong rom.

NOTE: Flashing the wrong stockrom may cause a serious problems and some time may damage your phone and can't be flashed again.
As I said that you have an idea of flashing so you are flashing your phone on your own. I'm not responsible for any damage.


Short tutorial on how to flash your tecno P5, Please read this tutorials to prevent any error while flashing your phone.

1. Download MTK USB-VCOM driver and install it in your computer. If you don't know how to install this driver then read read full tutorial on how to install MTK USB-VCOM drivers.

2. Download SP-Flash tool and extract it to your computer.

3. Download TECNO P5 firmware/flashfile and extract it to your computer.

4. Open Sp flash tool folder that you extracted and run "flash_tool.exe" or "flash tool" .(Recommended to run it as administrator"Run as administrator").

5. Click choose "Scatter loading file" and navigate where you extracted your flash file and then select the scatter file usually it looks like "MT6572_Android_scatter".

6. In sp flash tool do not select preloader if you don't what you are doing and then click download.

7. Power off your phone and an then remove the battery.

8. Connect your phone to your computer using USB cable wit out battery.

9. Once your computer has detected your phone then immediately inset your battery. If your phone did't detected your phone then the driver is installed correctly or your USB cable does not work properly so try to fix these issues and try again.

10. Wait until the flashing process is done.

11. Disconnect your phone from computer and power it on.
You are all done.

NOTE:Once you power on your phone it will take long time at the first time then normal.

                                         TECNO P5 SPECS

                        GENERAL
Platform:                Android 4.2.2 Jelly Bean
Processors:      1.0 GHz dual-core Mediatek MT6572E CPU
RAM:              512 MB
Dimensions:      124.3 x 65.5 x 10.5mm
Keyboard:      Touchscreen
Colors:              White, Black, Yellow, Gray, Pink
Displa Size:      480 x 800 pixels, 4.0 inches, 233 pixels per inch (PPI)
SIM:                      Dual mini SIM
Card slot:              MicroSD, up to 32 GB
Internal Storage:   4GB

           CONNECTIVITY
2G:                     GPRS – up to 85.6 kbps; EDGE – up to 236.8 kbps
3G:                     Up to 22.2 mbps uplink; Up to 5.76 mbps downlink
4G:                     No
WIFI:             Wi-Fi 802.11 b/g/n, WIFI hotspot, Wi-Fi direct
Bluetooth:      Version 3.0
GPS :                    A-GPS
NFC:              No
USB:              MicroUSB v2.0

            CAMERA
Primary:           5MP, up to 2560×1920-pixel pictures, HDR, face and smile detection camera with                                LED flash
Video:           VGA
Secondary:    2MP up to 1600×1200-pixel pictures

            BATTERY
Capacity:               1800 mAh Li-Ion battery
Stand-by:       Up to 288 hours
Talk time:       Up to 8 hours, 30 minutes


TO DOWNLOAD TECNO P5 Old OS click the button below

This is a tecno M3 stockrom you can download and flash your tecno M3. But before to download the file make sure you read this article because it contain some important tips that will help you to prevent errors that may happen during flashing your phone.

Also make sure to read shot tutorial below on how to flash your tecno M3, you can also read the specs to prevent downloading the wrong file and may damage your phone.


Short tutorial on how to flash your tecno M3, Please read this tutorials to prevent any error while flashing your phone.

1. Download MTK USB-VCOM driver and install it in your computer. If you don't know how to install this driver then read read full tutorial on how to install MTK USB-VCOM drivers.

2. Download SP-Flash tool and extract it to your computer.

3. Download TECNO M3 firmware/flashfile and extract it to your computer.

4. Open Sp flash tool folder that you extracted and run "flash_tool.exe" or "flash tool" .(Recommended to run it as administrator"Run as administrator").

5. Click choose "Scatter loading file" and navigate where you extracted your flash file and then select the scatter file usually it looks like "MT6572_Android_scatter".

6. In sp flash tool do not select preloader if you don't what you are doing and then click download.

7. Power off your phone and an then remove the battery.

8. Connect your phone to your computer using USB cable wit out battery.

9. Once your computer has detected your phone then immediately inset your battery. If your phone did't detected your phone then the driver is installed correctly or your USB cable does not work properly so try to fix these issues and try again.

10. Wait until the flashing process is done.

11. Disconnect your phone from computer and power it on.
You are all done.


NOTE:Once you power on your phone it will take long time then normal.

                           TECNO M3 SPECS 
GENERAL
OS Platform:              Android 4.2 OS (Jelly Bean)
Processor:                  1GHz Dual-core Processor
RAM: 512MB 
Colours:                       Black, White, Pink, Metallic Grey
SIM:                              Dual-SIM, dual standby
Dimensions:                115.3 x 61.2 x 11.9 mm
Display:                         3.5-inch Capacitive TFT Display (320 x 480 pixels, 165 ppi)
Camera:                        5MP with Flash
Front Camera:             0.3MP
Keyboard:                   Touchscreen
Storage:                        4GB built-in storage (1GB available)
External Storage:       MicroSD support up to 32GB
Display:                       3.5-inch Capacitive TFT Display (320 x 480 pixels, 165 ppi)

NETWORK
2G Network:      GSM 850 / 900 / 1800 / 1900 GPRS – up to 85.6 kbps; EDGE – up to 236.8                               kbps
3G Network: HSDPA 2100 Up to 22.2 mbps uplink; Up to 5.76 mbps downlink
4G Network:         No

CONNECTIVITY
Wi-Fi:             802.11 b/g/n
Wi-Fi Hotspot         
GSM/EDGE 900/1800MHz
WCDMA 2100MHz
3.5G Internet
Bluetooth 3.0
USB 2.0
GPS A-GPS

AUDIO
Alert types Vibration, MP3 ringtones
Loudspeaker Yes
Audio port 3.5mm jack

VIDEO
Video VGA

SOCIAL MEDIA
Twitter: Yes
Facebook: Yes
Opera Mini: Yes
Gmail: Yes

BATTERY
1400mAH Battery Capacity
Up to 5 Hours Talktime (3G)

Up to 400 Hours Standby Time

Click the button below to download this rom


MKRdezign

Fomu ya Anwani

Jina

Barua pepe *

Ujumbe *

Inaendeshwa na Blogger.
Javascript DisablePlease Enable Javascript To See All Widget